Creating System StoredProcedures in SQL Server

What is System StoredProcedures

A system StoredProcedure is a general stored procedure which started with ‘sp_’. System StoredProcedures are stored into the master database in SQL Server.

Requirement of System StoredProcedure

There are instances when you are required to perform some operations on the different databases, like finding the dependency of the table (sp_depends), you use the system StoredProcedure. There are many System StoredProcedure already provided by the SQL Server. some of the most commonly used are:

  • sp_who
  • sp_depends
  • sp_help
  • sp_helptext

Each of the above provide some pre-defined functionality, but there are chances where you want your own functionality. In that case you can create your own System StoredProcedures. Just create a StoredProcedure with prefix ‘sp_’ in the master database and you are ready to go. Here I am showing one I have created for my ease.

Example

[code language=”SQL” light=”true”]
— ======================================
— Author:      Anant Anand Gupta
— Date:        2010-05-10
— Description: Return the number of
—              records in the Table
— ======================================</p>
<p>USE master
GO</p>
<p>IF  EXISTS (SELECT * FROM sys.objects WHERE object_id = OBJECT_ID(N'[dbo].[sp_GetCount]’) AND type IN (N’P’, N’PC’))
DROP PROCEDURE [dbo].[sp_GetCount]
GO</p>
<p>CREATE PROCEDURE [dbo].[sp_GetCount] @TableName NVARCHAR(776)
AS
BEGIN
SET NOCOUNT ON
DECLARE @str NVARCHAR(1000)
SET @str = ‘Select Count(*) [Record Count] From ‘ + @TableName
EXEC (@str)
END
[/code]

Now you can execute the stored procedure in any database you want like this:

[code language=”SQL” light=”true” toolbar=”false”]
EXEC sp_GetCount ‘<TableName>’
[/code]


Extras

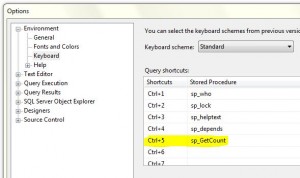
You can also create a keyboard shortcut for the above StoredProcedure to use quickly in between your SQL Code to find out the number of records in the selected table. Go to Tools -> Options -> Keyboard in SQL Server Management Studio. Select the text box in front of the predefined shortcuts which are not used. Enter the name of your StoredProcedure in the TextBox.

Click OK.

Open New Query Window (modifications are not registered with the windows already opened) for the required database. Enter the desired TableName and select the text and press your shortcut (Ctrl + 5 in my case). Here is your result

Enjoy and be more productive at your workplace !!!
How To: Provide Save File Dialog for an Image Request in ASP.Net

It is the default behavior of the web browsers, when you click on the image link, to open the image and display it over there. There are instances when you might want your users to remain on the page and simply download and save the image after clicking on the image link.

This functionality can be achieved in ASP.Net. Here I am going to show how to:

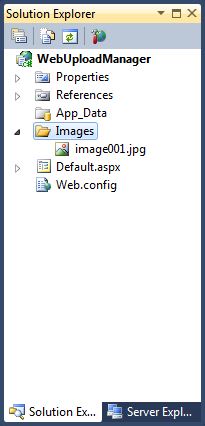
Create a blank ASP.Net Web Application. Now you have to create a folder to store the image to be downloaded and add and image to it.

Your solution should look similar to this:

Open the Default.aspx and create a HyperLink to the image like this:

<asp:HyperLink ID="hlDownloadImage" runat="server" NavigateUrl="~/Images/image001.jpg?Action=Download">Download Image</asp:HyperLink>

Note that the image URL is having additional parameter “Action” with value “Download”. We will see the utilization of the same in a moment.

now go and add a new file of Type ASP.Net Module ImageDownload.cs to the solution and modify the code as below:

public class ImageDownload : IHttpModule
{
    #region IHttpModule Members
    public void Dispose() { }

    public void Init(HttpApplication context)
    {
        context.BeginRequest += new EventHandler(context_BeginRequest);
    }
    #endregion

    public void context_BeginRequest(object sender, EventArgs e)
    {
        HttpApplication app = (HttpApplication)sender;
        HttpRequest req = app.Request;
        HttpResponse res = app.Response;
        if (req.Params["Action"] != null && req.Params["Action"].ToString() == "Download")
        {
            string path = req.AppRelativeCurrentExecutionFilePath;
            res.ContentType = "image/jpeg";
            res.AppendHeader("Content-Disposition", "attachment; filename=" + Path.GetFileName(path));
            res.TransmitFile(app.Server.MapPath(path));
            res.End();
        }
    }
}

Modify the web.config file to include following in <httpModules> section:

<add name="ImageDownload" type="WebUploadManager.ImageDownload"/>

You are done. Run the application and click on the Link for the image and you will see the Run/Save dialog. Try removing the Action parameter from the NavigationURL of the hyperlink; image will be displayed on screen as the default behavior of the browser.